home | history | downloads | supported devices | comparisons | special sensors | enersure | graphs | changelog | to-do | links | support | book | hosting | contact

Home-Built Sensors

Although there are a wealth of sensors available in the market, sometimes they are unsuitable for my applications, insufficiently environmentally rugged, or too expensive. So I have been forced to improvise and build my own sensors. This is a small gallery of my homebrew projects - maybe you'll get some ideas on how to build your own!

Submersible temperature sensor

First of all, you don't want your sensors to get wet (or even damp). If you power them parasitically, they will deliver very erratic readings, and if you power them using bus-power, the sensor wires will corrode rapidly (and then you'll get no readings at all after the corrosion replaces the wires).

So how then, could I make a sensor that was submersible? We wanted to measure water temperatures at a summer lake house on Lake George, NY. The sensor needed to be fully submersible, and in fact needed to sit at the bottom of the lake, which at this location o about 15' (or 5m) deep.

The first thing I did was to take a nibbler to a Radio Shack multipurpose PC board. I needed a tiny PC board with room to attach a DS1820, a 10pf tantalum capacitor (to reduce line noise) and the Cat-5 wires. So I nibbled out 3 rows of three adjacent conductors, and soldered in the pieces.

I applied a dab of thermal grease to the end of the DS1820 (to ensure accurate measurements), and slid the board into a blood-draw test tube (the kind with a rubber stopper that they take blood samples with). Before doing this, I punched a hole into the stopper, and threaded the wire through, and put a healthy dollop of MarineGoop on the inside and outside of the stopper (where the wire passed through), and then gooped the inside of the tube and pressed the stopper in place. After the first coat of goop dried, I applied a liberal amount of goop over the whole stopper, so that it completely covered the stopper and bridged over the glass.

Next, I connected the wires as shown with tie-wraps, gooped them to the glass, and connected a 3oz fishing weight. There are a couple of important things to note about the completed sensor (which survived for 2 years at the bottom of the lake, and performed flawlessly until we decommissioned it):

  1. The wire attached to the top of the glass, and the weight on the bottom ensure that the air pocket in the tube is always pointing up.
  2. Even if the stopper seal breaks open underwater, a 50% reduction in air volume (which would occur at 32 feet below the surface) would still not cause water to touch the DS1820 (the circuit board was also gooped, just in case).
  3. The loops of the wire are arranged so that the weight does not pull on the wire entering the stopper
  4. The wire entering the stopper is bound tightly to the glass, ensuring negligible "wiggle" (which might break the seal)

This sort of sensor should work fine in a water tank or lake, although I would suggest using a plastic tube for a swimming pool.

Solar Radiation Sensor

Hobby Boards sells a Solar Radiation Detector, but the case that they sell does not provide substantial protection from humid or outdoor environments, and I wanted to mount my sensor outdoors (and get a good reading on the level of sunlight). So, I built my own enclosure out of PVC pipe.

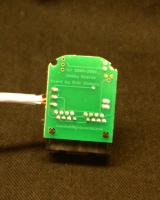
The first thing I had to do was reduce the size of the board a little, by grinding down the corners (carefully avoiding the PC board traces!) As you can see, after trimming, the board just fits into a 2" PVC end-cap. There is no room to use the RJ45 connectors, so I hard-wired the Cat-5 into the screw terminals.

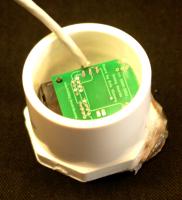
The next task was preparing the other end of the 2" cap. Using a Dremel, I drilled a hole large enough to allow the sensor to peer out of the cap. However, the end of the cap is about 3/8"" thick, and the sensor was sitting at the bottom of a deep hole (which would tell me when the sun was overhead, but would not give good light measurements any other time).

So using the Dremel, I carved out a conical section approximately 1" in diameter and about 3/8" deep (so very roughly, an oblique 30° cone). Since the cone would funnel rainwater directly onto the sensor, I sacrificed an old daylight filter from my 35mm camera and glued in over the aperture with silicone cement. This provides a waterproof but optically very clear surface for which the sensor to look at the sky, and allows that even the low-slanting light of winter mornings will reach the sensor.

Finally, because the sensor will be mounted pointing skyward (and the board might therefore fall out of its place in the cap), I applied a dab of silicone cement to each corner of the board. It is non-conductive, and will keep the board and sensor in place.

Kilns & Extreme Temperatures

Although I have not used it, there is a sensor available that can measure the temperartures as hot as a kiln produces. The TAI8560 from AAG Electronica (and probably other manufacturers have similar devices) will allow you to connect a type E, J, or K thermocouple to the 1-Wire bus, and read extremely high temperatures.
home | history | downloads | supported devices | comparisons | special sensors | enersure | graphs | changelog | to-do | links | support | book | hosting | contact